Understand the crucial differences between suspended timber floors and concrete construction for underfloor heating installation
One of the most common questions we receive from UK homeowners planning retrofit underfloor heating revolves around floor construction: “I have timber floors upstairs and concrete downstairs. Does this make a difference for underfloor heating?”
The short answer: absolutely.
The type of floor construction dramatically affects how underfloor heating performs, how it’s installed, and ultimately how efficient and cost-effective your system will be.
Let’s break down exactly why concrete slabs and suspended timber floors behave so differently with underfloor heating, and what this means for your installation decisions.
Understanding the fundamental difference
Before we discuss underfloor heating specifically, it’s essential to understand what makes these two floor types fundamentally different.
Suspended timber floors
Suspended timber floors are exactly what the name suggests: timber floorboards suspended on wooden joists with an air void beneath. This construction is typical in:
- Ground floors of pre-1950s properties (Victorian, Edwardian, 1930s houses)
- Upper floors of most UK properties regardless of age
- Period properties where original construction remains
The key characteristic is lightweight construction with an air gap beneath the floor surface, typically measuring 200 to 400mm, which provides ventilation to prevent timber rot.
Concrete floor slabs
Concrete slabs are solid mass construction that became standard for ground floors from the 1950s onwards and is universal in modern UK building. The key characteristic is solid mass construction with significant thermal mass and no air void beneath.
Why floor construction matters for underfloor heating?
The difference between timber and concrete isn’t just structural.
It fundamentally changes how heat behaves in your floor.
Thermal mass: The concrete advantage
Concrete has significant thermal mass, meaning it can absorb, store, and gradually release heat. When you install underfloor heating pipes in or beneath concrete, the slab warms up as water circulates through the pipes, storing thermal energy throughout.
This thermal mass distributes heat evenly across the entire floor surface, eliminating hot spots directly above pipes. Once warmed, concrete releases heat gradually and consistently, maintaining comfortable temperatures with minimal fluctuation whilst directing heat predominantly upward into the room rather than allowing it to escape downward.
This thermal mass effect makes concrete floors ideal for underfloor heating. The slab essentially becomes a large, efficient radiator working at low temperatures.
Suspended timber floors: The lightweight challenge
Timber floors lack thermal mass. The construction is deliberately lightweight, and the air void beneath creates specific challenges. Without proper insulation, significant heat escapes into the void beneath floorboards rather than warming the room above.
Low thermal mass means the floor heats quickly but also cools quickly, creating less stable temperatures. Performance depends heavily on insulation quality between joists, and without it, efficiency drops dramatically.
This doesn’t mean timber floors can’t have underfloor heating. They absolutely can. But the approach must account for these fundamental differences.
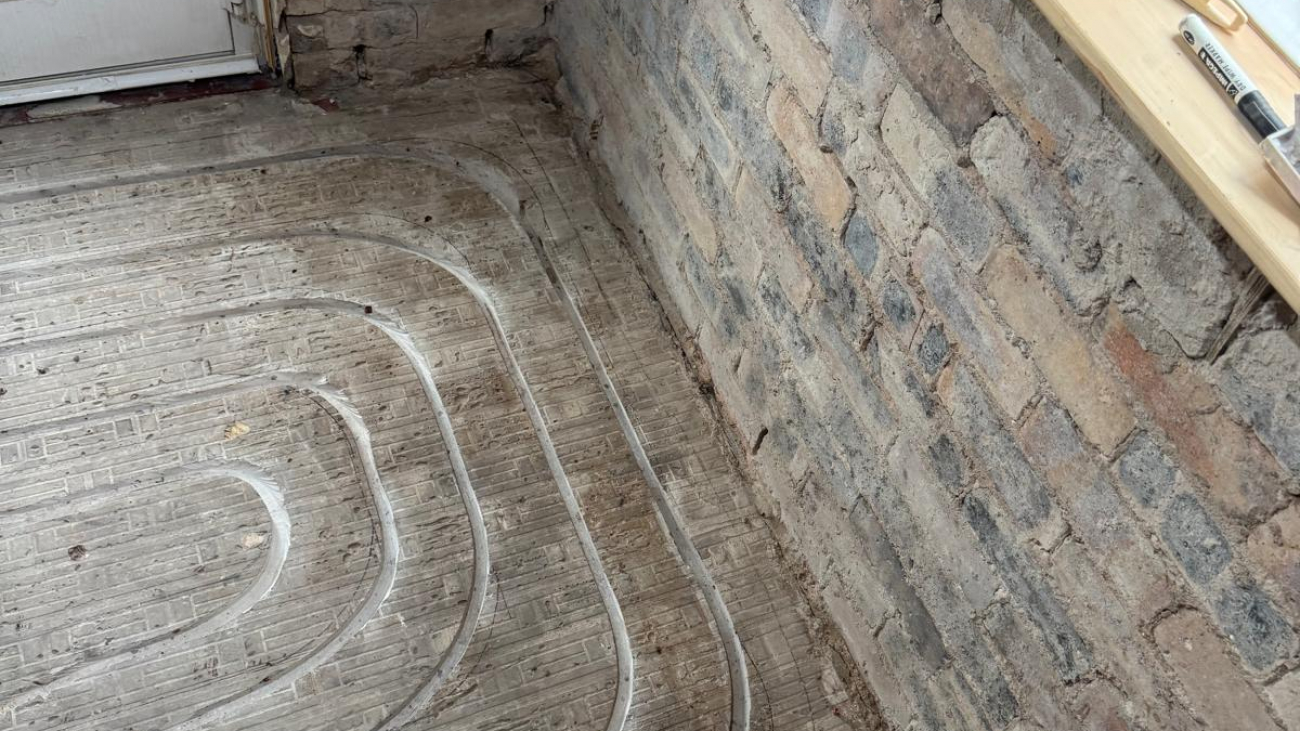
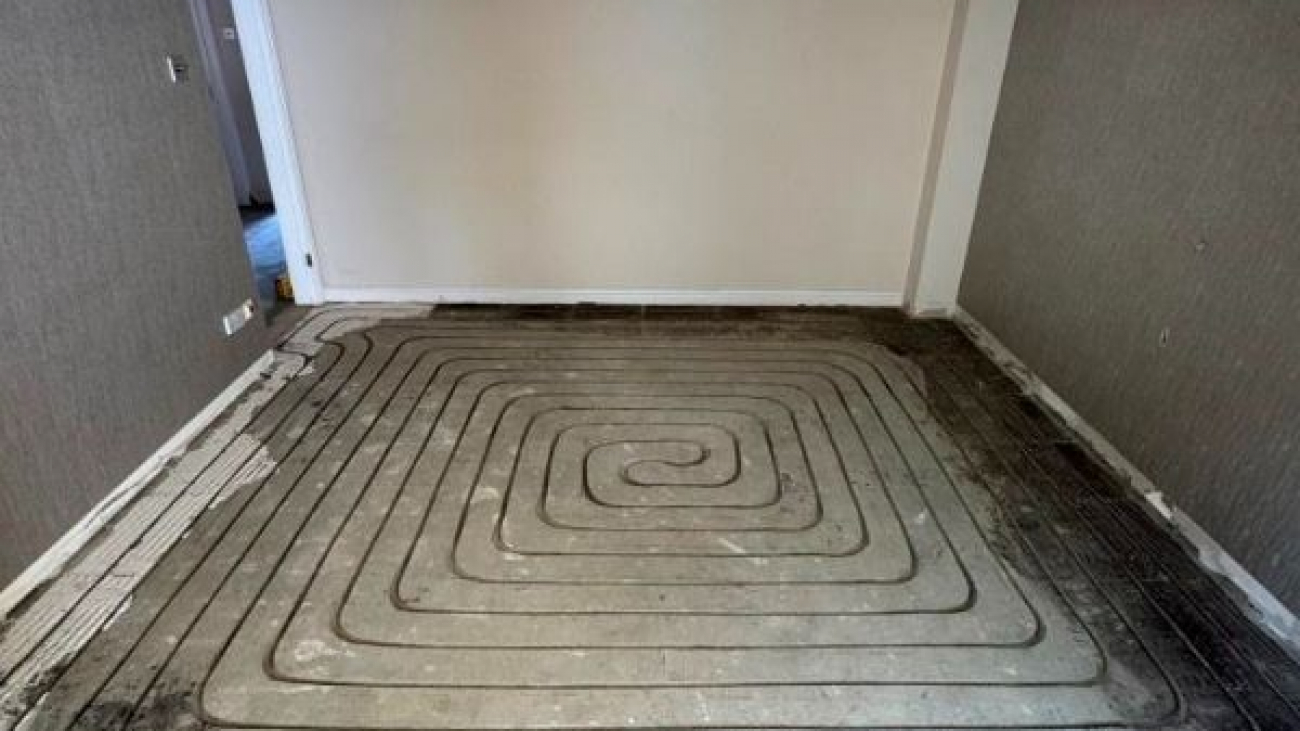
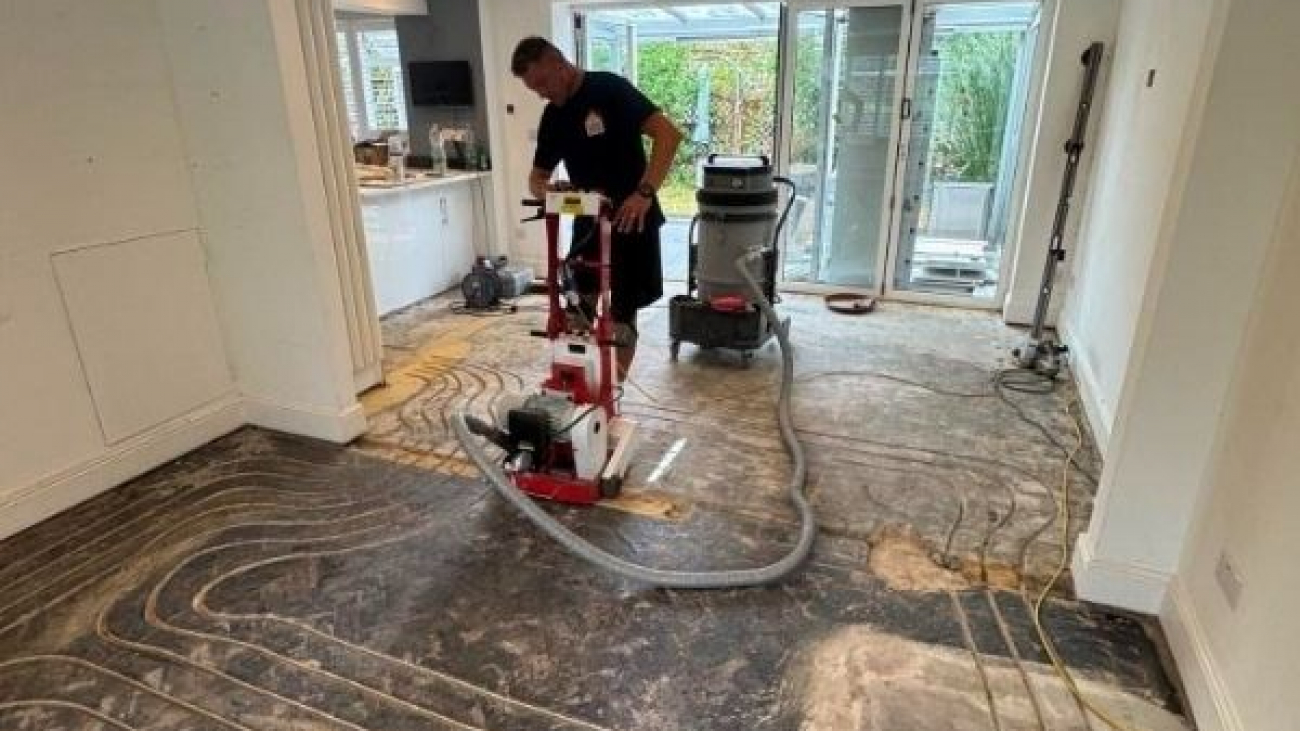
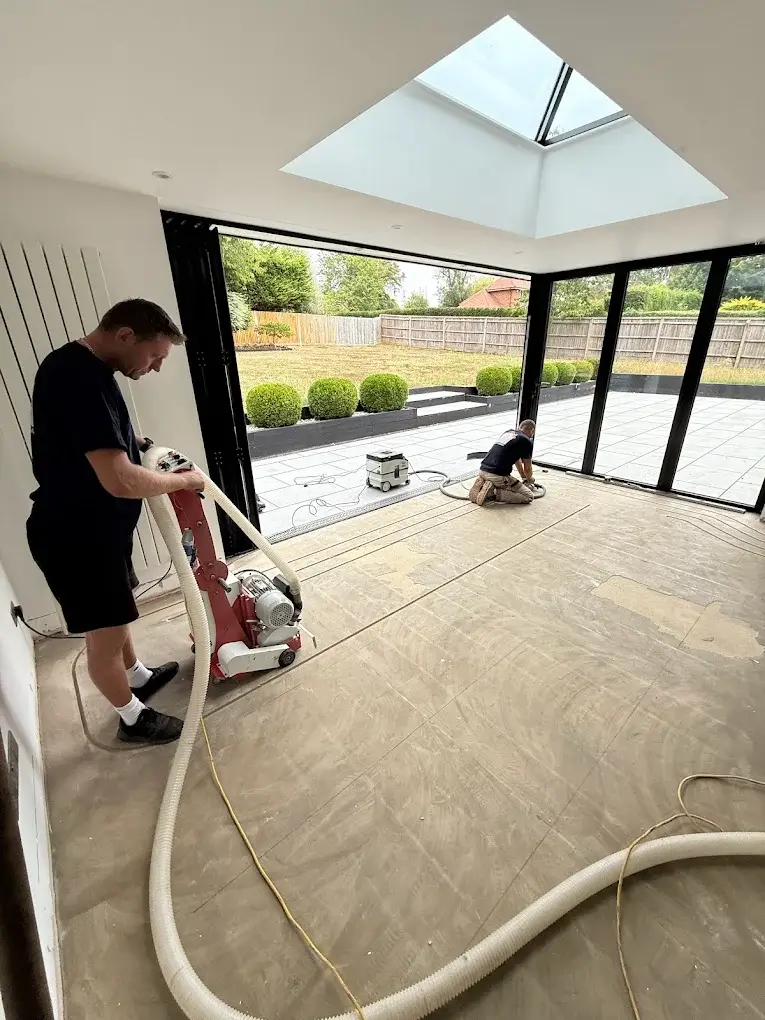
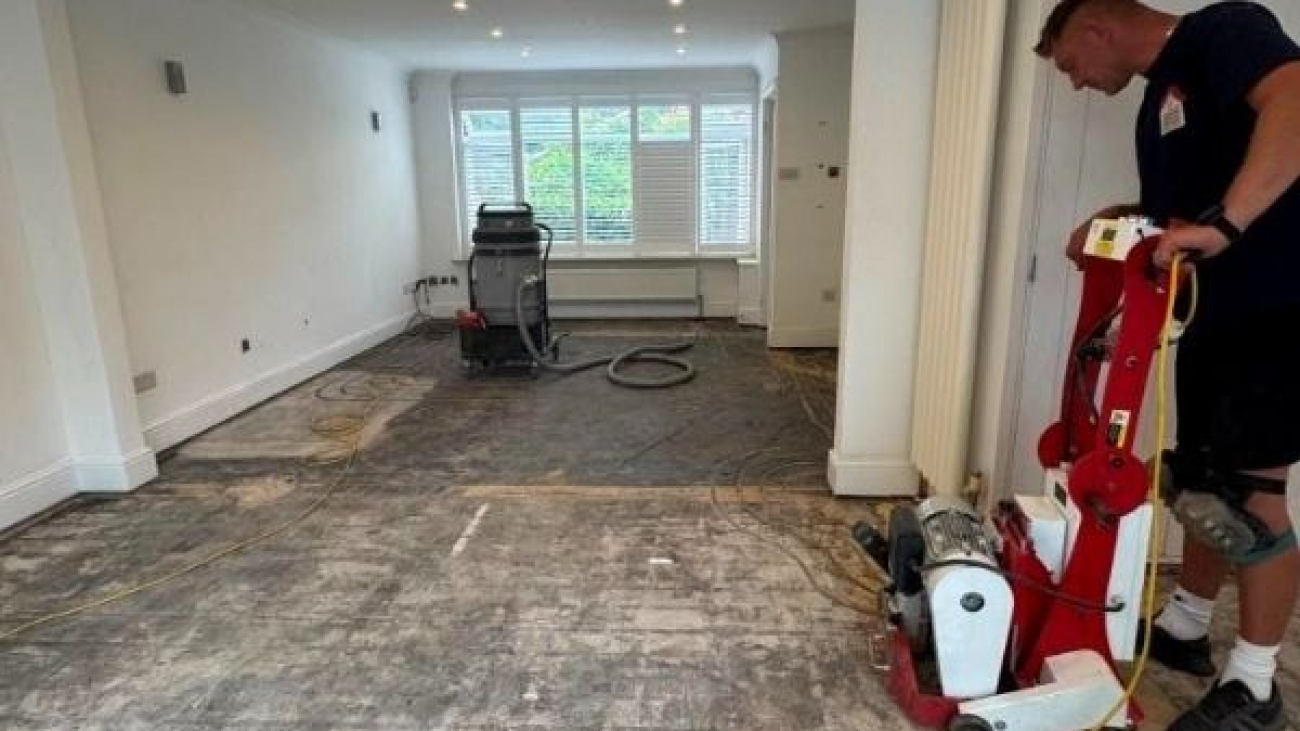
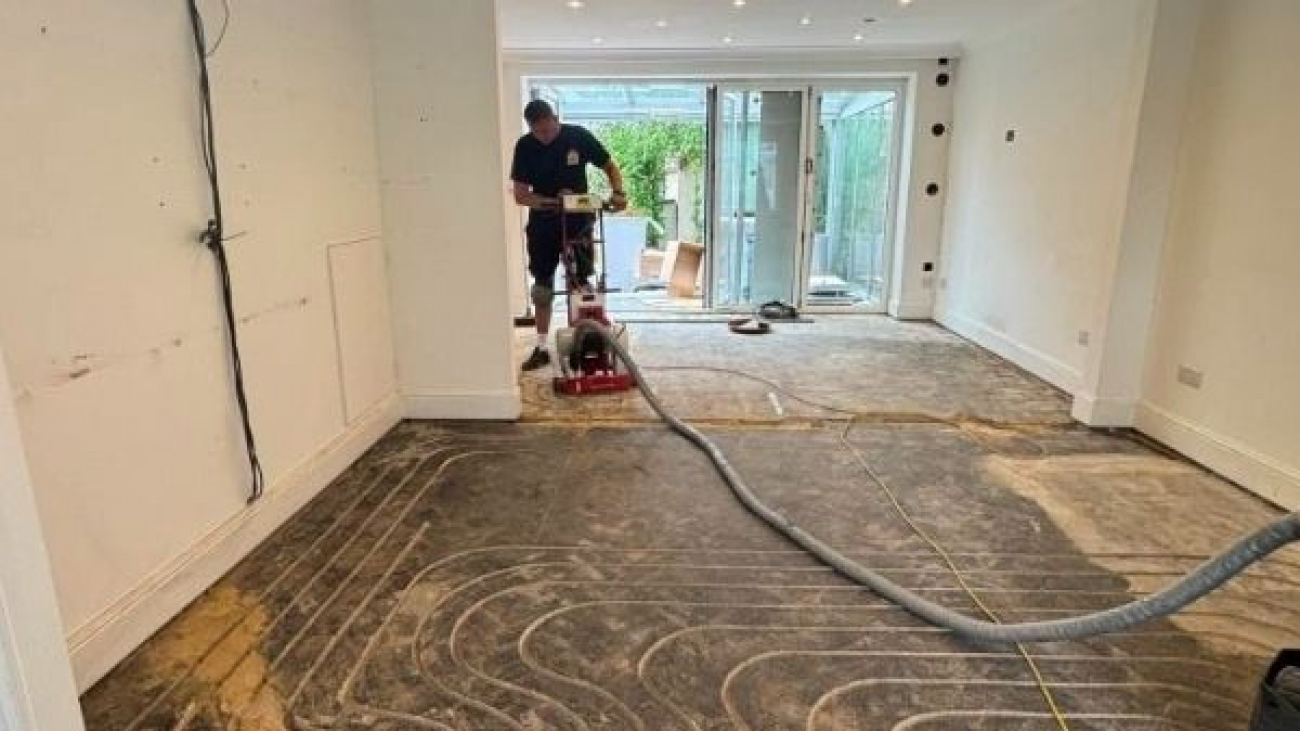
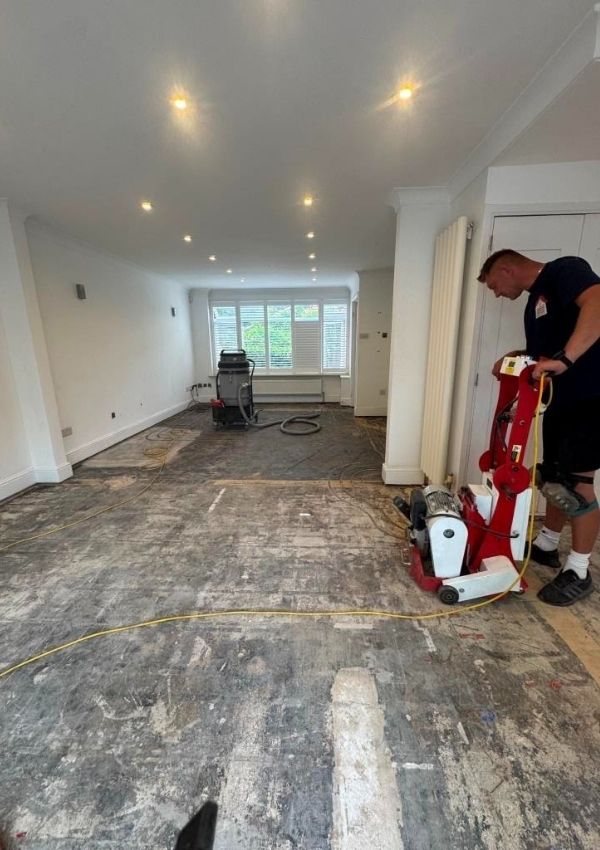
Underfloor heating on concrete floors: Channel-cutting approach
For concrete slabs, the optimal underfloor heating installation method uses the concrete’s thermal mass to maximum advantage. Our preferred approach for existing concrete floors involves precision milling.
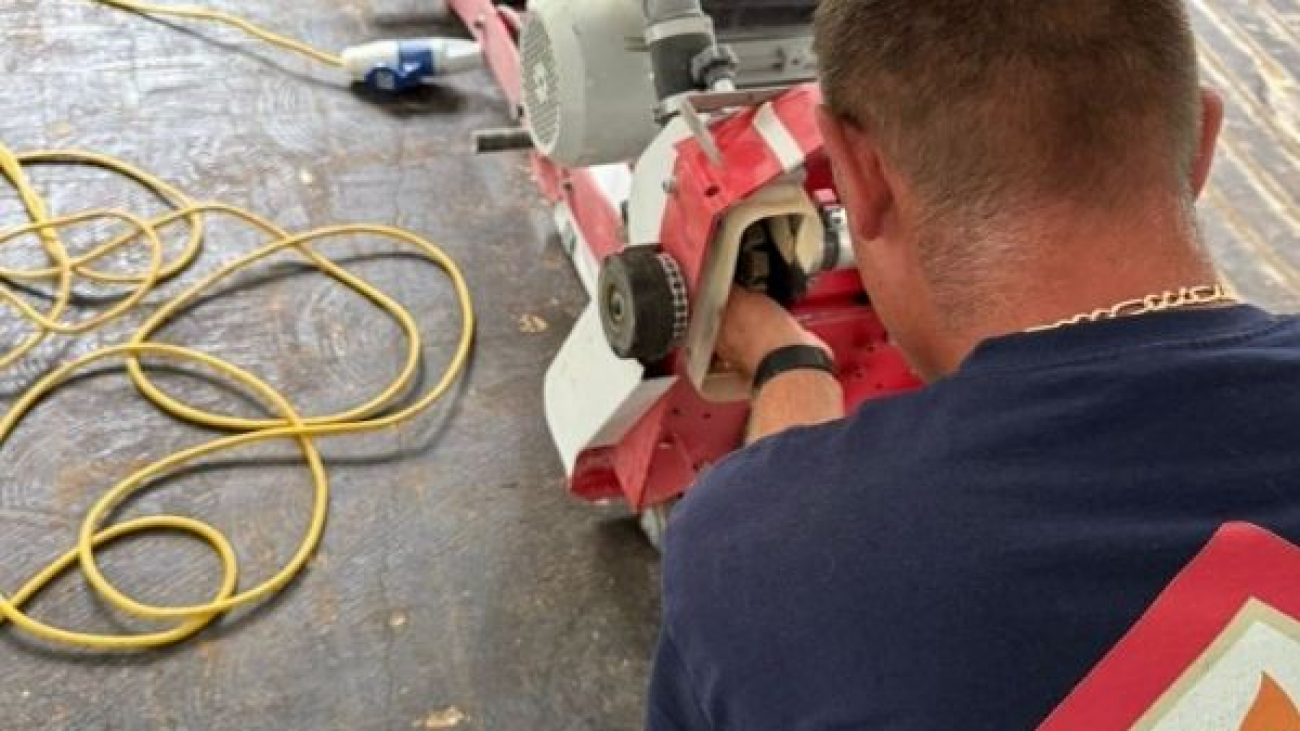
How the concrete milling works
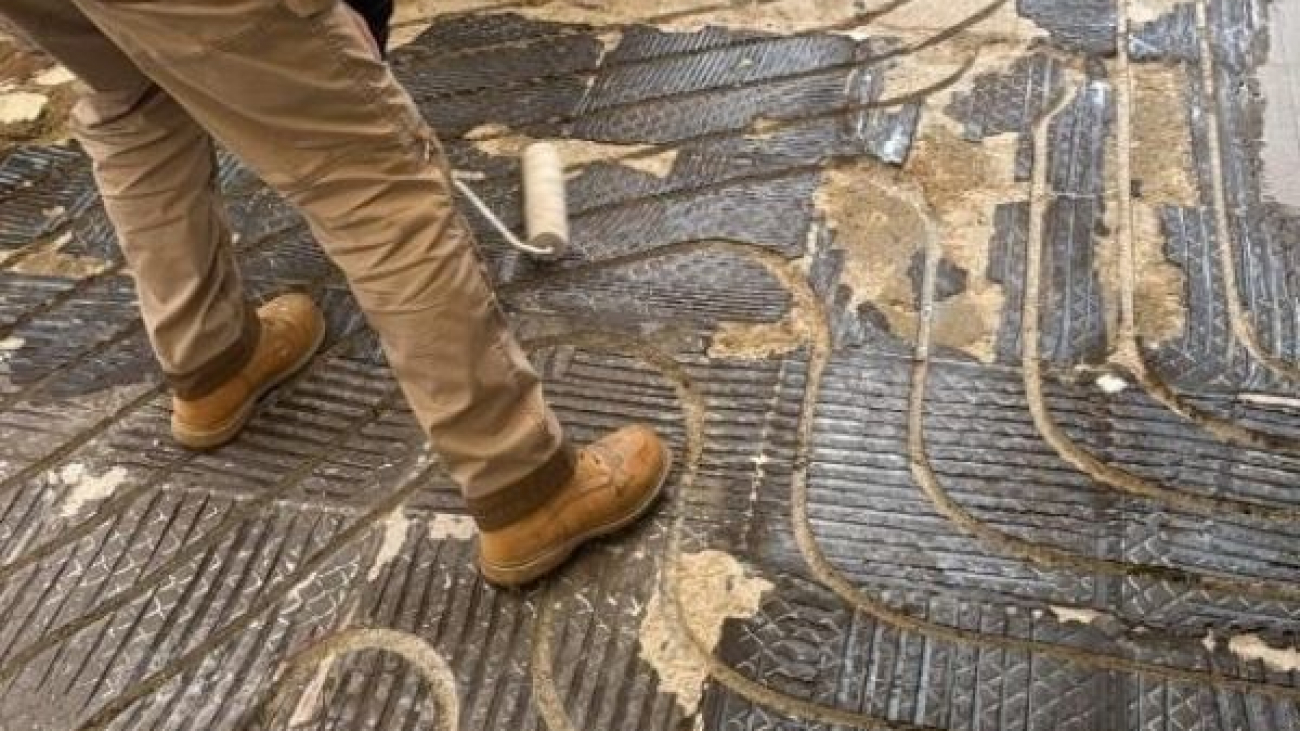
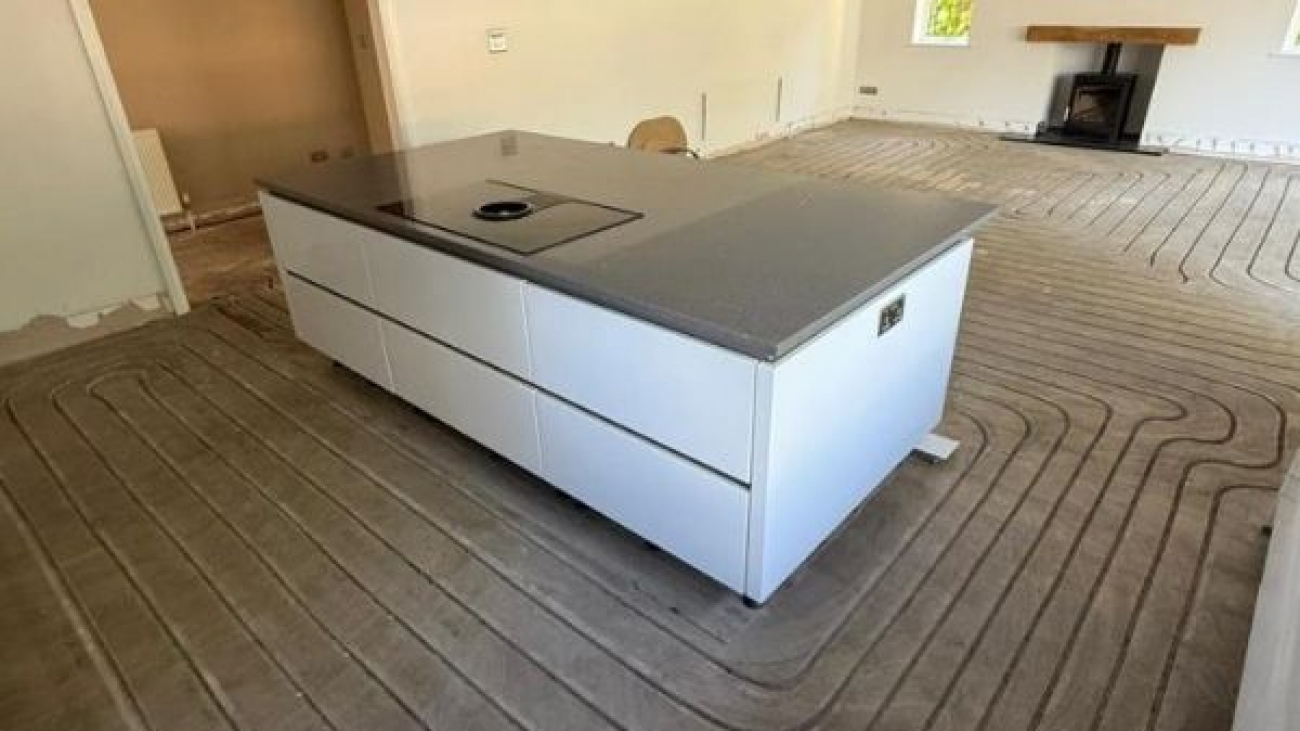
Specialised equipment cuts grooves directly into the existing concrete slab, typically 15 to 20mm deep. Heating pipes sit within these channels in direct contact with the concrete mass. The grooves are then filled with levelling compound that bonds to the concrete, restoring the original floor level. The result is pipes embedded within the concrete thermal mass itself, not sitting on top of it.
Why this approach delivers superior performance
Pipes in direct contact with concrete transfer heat efficiently into the mass, which then radiates it evenly upward. Because channels are cut into the floor rather than built on top, floor levels remain unchanged, which is crucial for door clearances and thresholds. Our 16mm pipes combined with direct concrete contact deliver warmth within 30 to 60 minutes rather than the hours that overlay systems require.
The concrete mass does exactly what it’s designed to do: store and distribute heat evenly whilst minimising downward losses. Embedded systems protected within the concrete slab last for decades with virtually no maintenance.
Why overlay systems have limitations on concrete?
Overlay systems are sometimes used where channel cutting is not suitable or where additional insulation above the slab is required. However, they do not sometimes fully utilise the thermal mass of the existing concrete slab.
With overlay approaches, the pipes heat the overlay boards, which then attempt to heat the concrete beneath them, which eventually warms the room. This creates additional resistance and slower response times compared to embedding pipes directly in the concrete mass. When you already have excellent thermal mass available in your concrete slab, channel-cutting allows you to make full use of this built-in advantage.
Underfloor heating on suspended timber floors: Different approach required
Timber floors require completely different installation techniques that account for the lightweight construction and air void.
Building Regulations and insulation requirements
When installing underfloor heating in properties with suspended timber floors, Building Regulations, particularly Approved Document L, become relevant.
Building Control typically requires insulation between joists to prevent excessive downward heat loss into the void. The system must demonstrate reasonable efficiency and not waste heat heating the space beneath the floor.
Without insulation between joists, a significant portion of your heating energy escapes downward rather than warming your room, making the system both inefficient and expensive to run. This isn’t about regulations being difficult. It’s about ensuring your heating system actually works efficiently.
Installation approaches for timber floors
Several methods exist for timber floor underfloor heating, each with different characteristics:
Between-joist installation with heat spreader plates: This involves fitting insulation between floor joists with aluminium heat spreader plates installed to joist sides. Pipes clip into these plates, distributing heat across the floorboard width. This approach offers minimal floor height increase and good performance when properly insulated.
Overlay systems on existing floorboards: Insulation panels are placed on existing floorboards with pipes installed within grooved panels. This typically adds 15 to 25mm floor height and requires door adjustments and threshold modifications. Performance depends heavily on insulation quality beneath.
Board removal and proper insulation: The most thorough approach involves lifting existing floorboards, installing comprehensive insulation between joists, fitting a heat distribution system, then replacing boards or laying new flooring. This delivers best performance but creates most disruption.
Why timber floors face different challenges?
Timber floor underfloor heating works with different physical properties than concrete installations. Lower thermal mass means timber and overlay boards respond to temperature changes more quickly than concrete, leading to less thermal stability. System efficiency depends heavily on insulation quality between joists, where any gaps or compression can affect performance. The installation requires careful design to encourage heat distribution upward through floorboards rather than downward into the void.
When properly insulated and installed with a suitable heat distribution system, suspended timber floors can still provide very comfortable and efficient heating. The key is understanding these characteristics and setting realistic expectations about how the system will perform compared to concrete installations.
Practical scenarios: Making the right choice
Understanding the theory helps, but how does this play out in real UK properties?
Consider a typical 1930s house with a ground floor extension. The original house has suspended timber ground floors whilst the new extension has concrete slab construction. The best approach uses channel-cutting installation in the extension, taking advantage of the concrete’s thermal mass for excellent performance with zero floor height increase. For the original house with timber floors, between-joist installation with proper insulation works well, though it requires different techniques and realistic performance expectations.
The floor constructions are fundamentally different. Trying to use identical installation methods on both would compromise performance on at least one. Building Regulations will definitely apply to the extension heating, and proper insulation in the existing timber areas matters for approval.
Performance comparison: Real-world differences
Let’s compare how identical underfloor heating systems perform on different floor types.
Heat-up time
Concrete slabs with channel-cutting using 16mm pipes typically show initial warm feeling within 15 to 20 minutes, with rooms becoming comfortable in 30 to 60 minutes.
Timber floors with proper insulation and heat plates take 20 to 30 minutes for initial warmth and 60 to 90 minutes until rooms feel comfortable.
The concrete slab’s thermal mass creates faster, more even heat distribution once the system reaches operating temperature.
Running costs and efficiency
The cost differences are significant:
- Concrete slab systems: £3 to £5 per square metre annually with excellent efficiency
- Well-insulated timber floors: £5 to £7 per square metre annually
- Poorly-insulated timber floors: £8 to £12 per square metre annually
The difference between well-insulated and poorly-insulated timber installations can double running costs.
Temperature stability
Concrete thermal mass maintains stable temperature for hours even after heating cycles off, creating very consistent comfort levels. Timber’s lightweight construction means temperature fluctuates more noticeably with heating cycles, with less background warmth between active heating periods.
Cost implications: Timber vs concrete installation
Installation costs vary significantly based on floor construction.
Concrete floor channel-cutting (typical 50m² ground floor)
Total cost: £5,000 to £8,000 (£100 to £160 per m²)
This includes professional survey and design, precision channel milling with dust extraction, 16mm pipe installation, pressure testing and commissioning, zero floor height increase, and completion within one to two days.
Timber floor installations (typical 50m² floor)
Between-joist approach: £6,000 to £9,500 (£120 to £190 per m²)
This includes board lifting and replacement, comprehensive joist insulation, heat spreader plate system, pipe installation and manifold, system commissioning, and installation over four to six days.
Overlay approach: £5,500 to £8,500 (£110 to £170 per m²)
This includes overlay insulation panels, grooved pipe installation, floor height increase of 15 to 25mm, door and threshold adjustments, and completion within three to four days.
Timber floor installations generally cost more due to additional complexity, longer installation times, and comprehensive insulation requirements.
Which floor type should you choose for new construction?
If you’re building an extension or planning new construction, you have the opportunity to choose floor type based on your heating requirements. Concrete construction generally offers more favourable conditions for underfloor heating performance.
What to specify for new builds and extensions
For optimal underfloor heating performance, consider specifying ground-bearing concrete slab with proper insulation beneath, sufficient slab thickness for channel-cutting (minimum 100mm), quality damp-proof membrane and edge insulation, and early consideration for underfloor heating during the design phase.
Why concrete works well for underfloor heating projects
Concrete construction offers several advantages for underfloor heating: superior thermal performance and efficiency, straightforward installation process, lower long-term running costs, better temperature stability, longer lifespan with minimal maintenance, and simpler Building Regulations compliance for insulation requirements.
That said, if structural or other considerations require timber construction, properly designed timber floor heating systems can deliver excellent results when installed with appropriate insulation and heat distribution methods.
Getting professional advice for your specific property
Floor construction is just one factor in determining the best underfloor heating approach for your property. Professional assessment considers your exact floor construction type and condition, existing insulation levels and Building Regulations requirements, room-by-room heat loss calculations, and practical constraints like floor height limitations and door clearances.
Professional installers with experience in both concrete and timber floor systems can provide honest advice about which approach suits your specific situation best.
The bottom line: Concrete vs timber for underfloor heating
To summarise the key characteristics of these floor types for underfloor heating:
Concrete slabs offer:
- Excellent thermal mass for even heat distribution
- Good efficiency and lower running costs
- Faster heat response with channel-cutting installation
- Zero floor height increase with precision techniques
- Stable temperatures and consistent comfort
- Straightforward installation process
- Minimal long-term maintenance requirements
Timber floors works best with:
- Comprehensive insulation between joists for efficiency
- Appropriate heat distribution systems
- Realistic expectations about running costs
- Understanding of thermal response characteristics
- Careful attention to Building Regulations requirements
- Professional installation and design
Both floor types can accommodate effective underfloor heating when approached properly.
Concrete floors offer inherent advantages due to their thermal mass properties, whilst timber floors require more careful specification but can deliver very comfortable heating when properly insulated and installed with suitable heat distribution systems.
If you’re planning underfloor heating and have concrete ground floors, you’re working with construction that naturally suits this heating method. If you have timber floors, professional installation with comprehensive insulation and appropriate systems delivers excellent results when designed with the floor construction characteristics in mind.
Ready to discuss underfloor heating for your specific floor type?
Whether you have concrete slabs, suspended timber floors, or a mixture of both, we provide honest professional advice about the best approach for your property.
Our underfloor heating free assessments include floor construction evaluation and suitability analysis, specific recommendations for concrete or timber installations, realistic performance and cost expectations, Building Regulations guidance, and transparent pricing with no hidden costs.